FAQ’s - GST Portal
About this product
GST Portal application is made to capture GST registration details of the business partner and vendors with Air India.
This application will help us to capture and maintain vendor details for business processing.
User/Vendor can register themselves with the Air India using this portal independently and can manage their account for future correspondence by their own.
Goods & Services Tax (GST) is a destination based tax on consumption of goods and services. GST would be applicable on Transport of Passengers by Air.
GST will be effective from 01st July’2017 for tickets issued worldwide whereas travel originates in India regardless of point of sale.
User Registration Form - FAQ’s
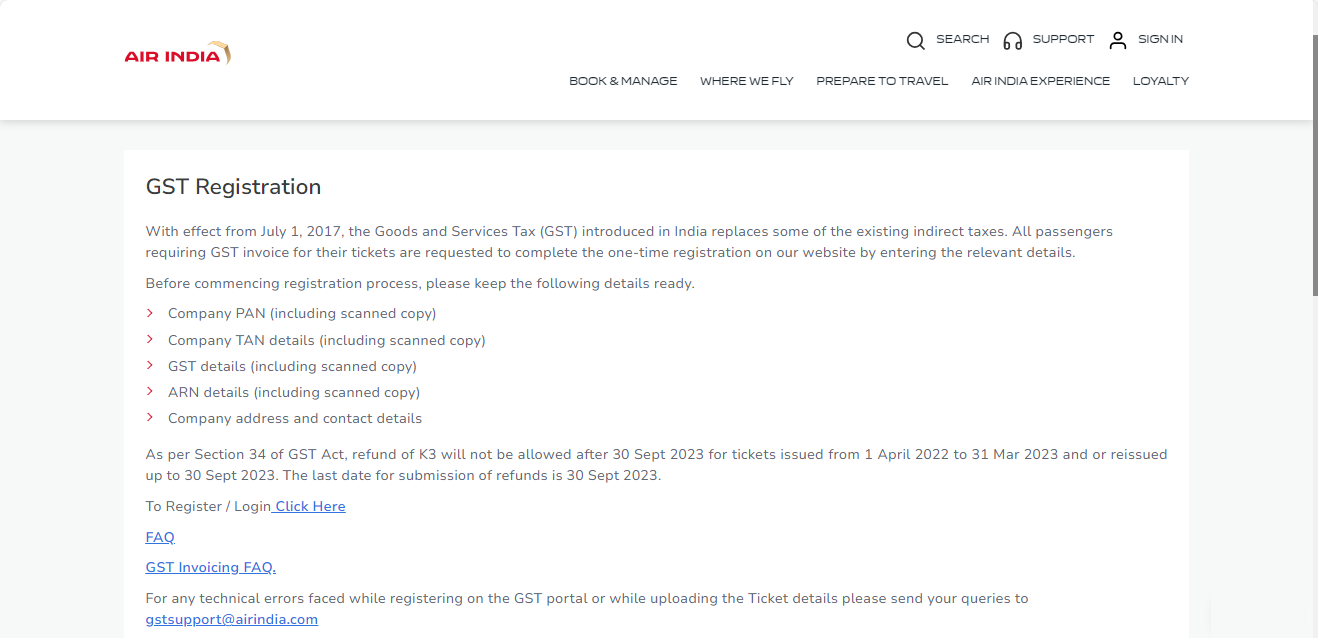
Go to Air India website and navigate to GST registration page. There you will find a link to “Register/Login”, as shown in below image. Click on it.
https://www.airindia.com/in/en/gst.html.
No. You need to register with the application to use features of this application.
No. We do not have option like guest user. You need to register with the application to use features of this application.
Before commencing the registration process, request you to keep the below mentioned details ready.
- Company PAN (including scanned copy)
- GST details (including scanned copy)
- ARN details (including scanned copy)
- Company address and contact details
No. You can register account only once with unique GST number & user email id.
If you are an e-commerce operator then please select this check box while registering your account with Air India.
If you have registered for GST as SEZ unit then please select this check box while registering your account with Air India.
User Account Activation - FAQ’s
After successfully registering with application you will get the auto generated email through registered email id, which contain account activation link with it as shown in the below image.
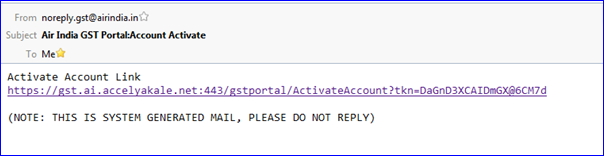 You need to click on the link provided in email within 24 hrs. from registration form is submitted.
You need to click on the link provided in email within 24 hrs. from registration form is submitted.
If Due to some reason, user is not able receive the email that contains User Account Activation link, then by following below steps you will be able to get that email again with new Account Activation link on his/her registered email id.
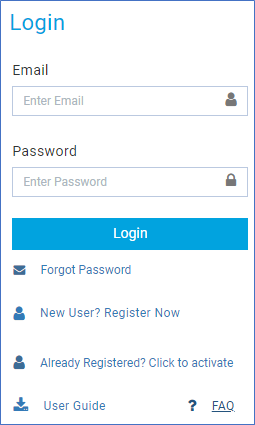
Click on the “Already Registered? Click to activate”. New pop up will open enter your registered email id there then click on “Send” button.
Login to the application - FAQ’s
If user has forgotten the password then it can be obtained by clicking on “Forgot Password” link present on the login page.
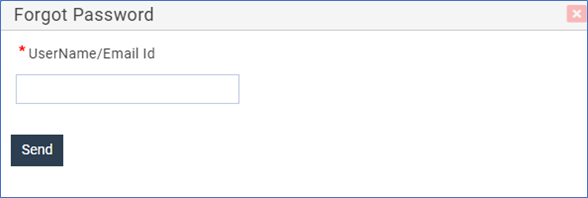 After clicking on the link new pop up will appear, you need to enter his/her registered email id and then click on send button. Then user need to check his/her email Inbox, where you will receive email containing account reset link.
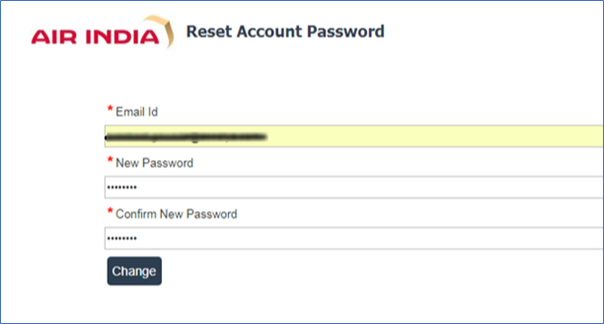
 Once email is received you need to click on the link available in email. Link will take you to the browser and new web page will open up. There you need to enter his details then click on “change” button.
After clicking on the link new pop up will appear, you need to enter his/her registered email id and then click on send button. Then user need to check his/her email Inbox, where you will receive email containing account reset link.
Once email is received you need to click on the link available in email. Link will take you to the browser and new web page will open up. There you need to enter his details then click on “change” button.
Yes. You can reset your password at any point of time. Follow the above steps [4.1].
You can reset password multiple time.
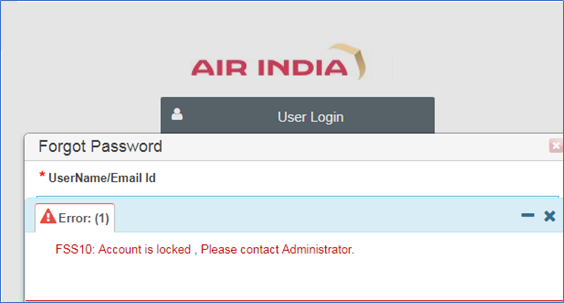
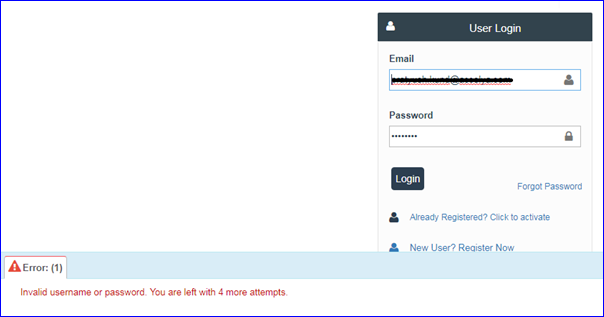
Yes. Your Account will be locked if max no. of invalid attempts to login exceeds 5 times.
User Account will be locked in below two cases -
1. If max no. of invalid tries to login exceeds 5 times.
2. No Usage of the account for more than 90 days.
Then user need to get account unlocked from Admin to login again. After account is locked user will not able to login the to application neither can use the password reset functionality.
 In case of “No Usage of the account for more than 90 days”, after user account is
reset by Admin user will be asked to change password for security purpose.
In case of “No Usage of the account for more than 90 days”, after user account is
reset by Admin user will be asked to change password for security purpose.
1. If max no. of invalid tries to login exceeds 5 times.
2. No Usage of the account for more than 90 days.
Then user need to get account unlocked from Admin to login again. After account is locked user will not able to login the to application neither can use the password reset functionality.
In case of “No Usage of the account for more than 90 days”, after user account is
reset by Admin user will be asked to change password for security purpose.
User will be prompted every time with the remaining attempts in order to prevent from trying multiple attempts with wrong password. In this case user can use the forgot password feature before account get locked and reset the password using link received through password reset email.
Product homepage and other modules FAQ’s
Conversation tab saves the recently accessed pages.
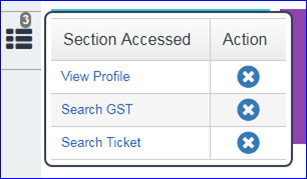 This will store the open modules/pages in a logged in user session until user closes them or logs out of the application. This will serve as a quick reference or shortcut to the opened pages. User can close the open pages by clicking the close button in front of the page names shown in the below image.
This will store the open modules/pages in a logged in user session until user closes them or logs out of the application. This will serve as a quick reference or shortcut to the opened pages. User can close the open pages by clicking the close button in front of the page names shown in the below image.
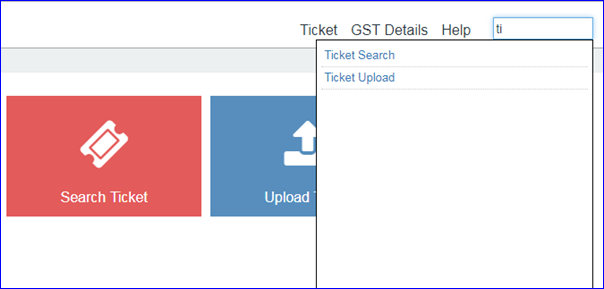
This will serve as a quick search option to search menu/screens. IntelliSense feature is provided here this will help you to search with partial input as well.
View Profile Module - FAQ’s
Yes. You can view and verify his/her profile detail on ‘View Profile’ screen. Which they entered while registration process with the application.
Yes. You can change only contact & address details post registration by clicking on ‘Edit’ button present in view profile screen.

You can also download and view documents attached while form submitted. A downloadable link is available in front of every document. Please note the link will present only if you had uploaded document while registration otherwise you will see a message as “File Not Uploaded”.
To maintain integrity of data & user details, only few of the fields are allowed to edit by user. Mainly address and contact number details are editable.
GSTIN registration - FAQ’s
No. You can’t change GST number once updated in the application. However you can change only contact & address details.
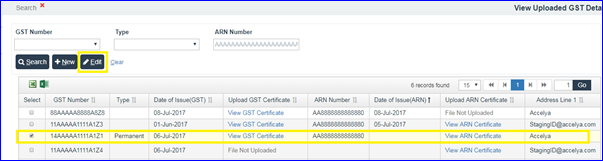
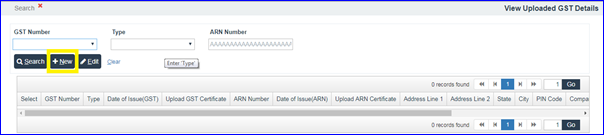
During the process of registration, it is mandatory to enter any one single GST number. Post registration, login and enter any additional GST details by clicking the ‘New’ button under the ‘View/Add GSTIN’ section on the Home page.
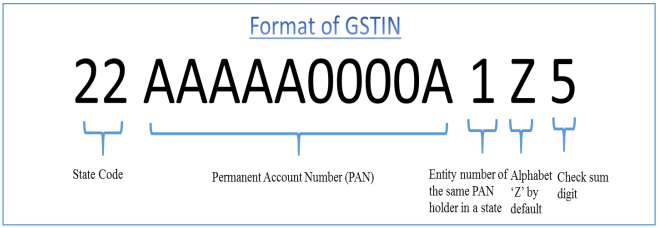
Every taxpayer will be assigned a state-wise PAN-based Goods and Services Taxpayer Identification Number (GSTIN) which will be 15 digit long.
The first two digits of GSTIN will represent the state code according to Indian Census 2011. Each state has a unique two digit code like “27” for Maharashtra and “10” for Bihar.
So if you are getting above error means GSTIN number is invalid as per the state codes provided by governing authority. Please check and confirm with GST number provider and then try again.
So if you are getting above error means GSTIN number is invalid as per the state codes provided by governing authority. Please check and confirm with GST number provider and then try again.
You can add as many GST numbers as you want. But those should be unique, duplicate GST number is not allowed to register.
Upload Ticket - FAQ’s
To upload ticket details, you first need to export template by clicking on “Export Template” button. A excel template will be downloaded to the local system of user. All fields are mandatory so you need to enter valid data in the template and need to import it in the application.
No. You need to enter any one of GST numbers registered under his/her account. This will not accept any other GST number that do not belongs to logged in users account.
Yes. You can upload multiple tickets at the same time.
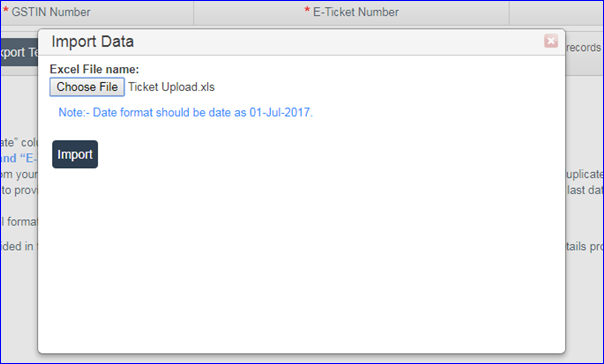 User is allowed to import only .xls OR .xlsx files. Also maximum of 1000 records can be imported in a single file.
If you wish to import more than 1000 records then he/she needs to segregate them in separate files for importing as a 1000 records per file,
and need to import them separately one file at a time.
User is allowed to import only .xls OR .xlsx files. Also maximum of 1000 records can be imported in a single file.
If you wish to import more than 1000 records then he/she needs to segregate them in separate files for importing as a 1000 records per file,
and need to import them separately one file at a time.
No. Ticket number should be unique, duplicate numbers are not allowed.
You can also add multiple ticket numbers manually as well without importing data from excel file. To add new row in the editable table click on “Add Ticket” button.
After clicking on add ticket button new row will be added in the table as shown in below image.

Before entering dates in excel file please check the date format settings in your local system, to be read & interpreted correctly by application.
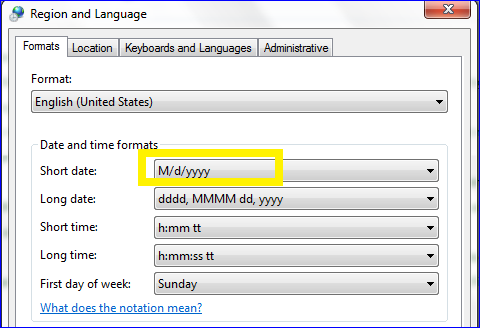
Please follow below steps to find out in what format you should enter the date.
1. Go to control panel and click on “Region and Language”.
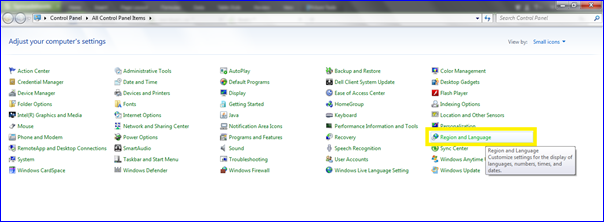 2. A new pop up will open, on the pop please check the value in front of short date option. User need to enter the date in same format only to avoid any errors in file import validation.
1. Go to control panel and click on “Region and Language”.
2. A new pop up will open, on the pop please check the value in front of short date option. User need to enter the date in same format only to avoid any errors in file import validation.
Search Ticket - FAQ’s
Yes. You can search and verify ticket numbers using ‘Search Ticket’ option.

Yes. You can download the ticket number details uploaded under his account using ‘Export Excel’ option.
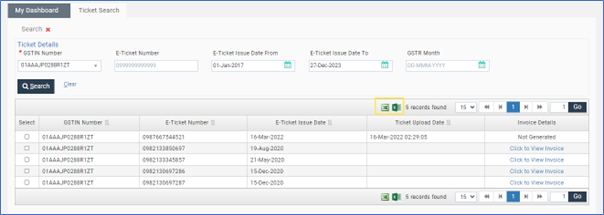
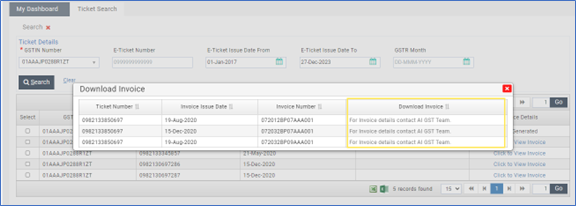
You can view and download the invoice of the processed ticket from the search ticket screen.
The invoice status for the processed ticket will be present in the ‘Invoice Details’ column as a clickable link, after clicking on it new pop up will open with the link the to download PDF file invoice as shown in below images. It will also have other details like invoice number & invoice issue date.
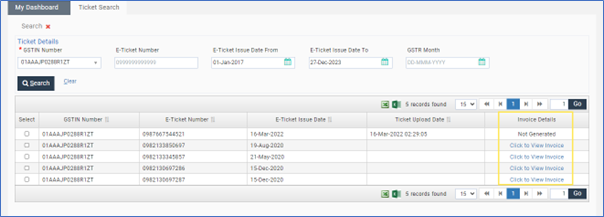
 Tickets with the status as ‘Invoice generation in progress’ indicates those are in process and invoice for download will be available soon.
The invoice status for the processed ticket will be present in the ‘Invoice Details’ column as a clickable link, after clicking on it new pop up will open with the link the to download PDF file invoice as shown in below images. It will also have other details like invoice number & invoice issue date.
Tickets with the status as ‘Invoice generation in progress’ indicates those are in process and invoice for download will be available soon.
Exiting the Application (Logout) - FAQ’s
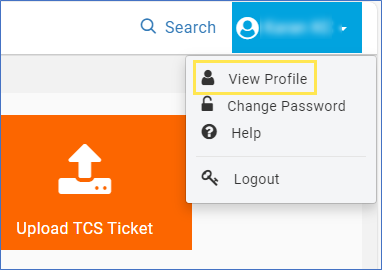
If user wish to log out of the application then he/she can find a “Logout” option under the user profile option in the right top corner. Clicking on it user will be successfully logged out of the application and redirected to login screen.

GST Invoicing Queries - FAQ’s
1.The GST details required for invoicing like GSTN, name of the user, address, email id and phone number are captured from either SSR or as per registration on portal. In case details are available against a particular ticket in SSR and also in portal, portal data will take precedence for invoicing.
2.The cut off date for uploading ticket details is mentioned on AI GST portal from time to time in line with due dates announced by GST council. In case, data is not uploaded within portal off dates, same will be treated as B2C and no revision of these tickets to B2B will be entertained.
3.Invoices are generated on monthly basis and not per ticket basis.
4.Invoices are generated after filing of GSTR 1 as per Government stipulated dates. In case of wrong GSTIN, if email id is available, mails are sent to provide correct email id within a day’s time. In case same are not received, the tickets are treated as B2C.
5.Once GSTR 1 is filed, invoices are sent to registered email id’s captured from SSR /AI GST portal and also uploaded on AI portal for download upto one year from the date of invoice.
6.It is requested to register on AI GST portal and upload ticket details within due date to get the invoices. Uploading of ticket details is not mandatory. However, if data at the time of booking is incorrect / incomplete, the same can be updated at the time of upload on GST portal.
7.In case of SEZ, registration on AI GST portal is mandatory. SEZ option to be ticked as Y.
8.In case of single journey, one invoice is issued and in case of return journey, two invoices are issued for a single ticket.
| Sr No | Queries | Replies |
|---|---|---|
| 1. | Tickets originating outside India. | If the origin of the travel is outside India GST is not applicable on the ticket hence GST invoice is not issued. |
| 2. | Invoices are not uploaded on the portal. | Invoices are generated and uploaded on portal only after GSTR-1 is filed. |
| 3. | Invoice not generated for particular tickets | Tickets are loaded after cutoff date as mentioned in the portal. Hence treated as B2C or GSTN details are not provided in SSR / portal. |
| 4. | Incorrect email id details loaded from SSR or from Portal | Correct email id to be informed to gstsupport@airindia.in for updating on portal. |
| 5. | Invoice issued in incorrect name. | Invoices are issued as per details available in SSR /Portal. If details available against particular ticket, both from SSR and portal, portal data will take precedence. If name is incorrect but GSTN is correct, input can be availed by user. Name can be corrected by sending mail to GSTsupport@airindia.in for prospective months. |
| 6. | Incorrect Invoice received | In case of incorrect Invoice generated, correct invoice with correct GSTIN and ticket details will be generated by AI. A mail to be initiated to GSTSupport@airindia.in. The same will be prospective. |
| 7. | Request to change from B2C to B2B | Law does not permit changing invoice from B2C to B2B. |
| 8. | Change in GST number or details which are not allowed to edit for user through front end | AI needs to update the details after confirmation from the user that earlier details will not be available against the old user id. Also old invoices will not be available for download. |